Map
From The Urban Dead Wiki
Jump to navigationJump to search
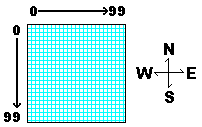
Urban Dead uses a grid coordinate system ranging from [0,0] in the northwest to [99,99] in the southeast. The first number represents east/west position. The second number represents north/south position. A map of the entirety of Malton can be found here, while clicking on the link to each suburb and scrolling down to the bottom of the page shows a detailed map of that suburb.
Notation
- [ 0,-1] - move 1 square north
- [ 1,-1] - move 1 square, diagonally, north/east
- [ 1, 0] - move 1 square east
- [ 1, 1] - move 1 square, diagonally, south/east
- [ 0, 1] - move 1 square south
- [-1, 1] - move 1 square, diagonally, south/west
- [-1, 0] - move 1 square west
- [-1,-1] - move 1 square, diagonally, north,west
Distance
To determine the distance between two locations, subtract the location coordinates respectively. To determine the least amount of Action Points traveling between the two locations will cost, use the highest number of the absolute value of the distance.
Examples
- You are at the Police Dept at [90,94] and would like to reach the Fire Station at [90,99]. Subtract the two coordinates. You are left with [0,5]. Hence, you will need to move 5 squares south.
- You are at the Fire Station at [90,99] and would like to reach the Hospital at [93,97]. Subtract the two coordinates. You are left with [-3,2]. Covering this distance requires at least 3 AP and can be accomplished by moving southwest for 2 squares and west for 1 square.
- This continues to apply for long distances. You are at the Hospital at [93,97] and would like to reach the City Zoo in Ketchelbank at [45,33]. Subtract the two coordinates. You are left with [-48,-64]. You could move northwest for 48 squares, and then just west for 16 squares to reach your destination. This would cost 64 AP as a survivor and 128 AP as a zombie without Lurching Gait.
