User:Chief Seagull/Doctor Parrott: Difference between revisions

From The Urban Dead Wiki
Jump to navigationJump to search
No edit summary
No edit summary
Line 69: Line 69:
| 4
| 4
|-
|-
| style="padding-left: 10px;" |[[The Milnerr Building]]
| style="padding-left: 10px; font-size: 8pt;" |
| 3
#[[The Milnerr Building]]
#[[The Purt Building]]
#[[The Selley Building (Jensentown)]]
#[[The Style Building]]
| valign="top" | 3
|-
|-
| style="padding-left: 10px;" |[[The Purt Building]]
| style="padding-left: 10px; font-size: 8pt;" |
| 3
#[[The Eglen Building]]
#[[The Evett Building]]
#[[The Frauley Building]]
#[[The Oxley Building (West Becktown)]]
#[[The Pask Building]]
| valign="top" | 2
|-
|-
| style="padding-left: 10px;" |[[The Selley Building (Jensentown)|The Selley Building]]
| style="padding-left: 10px; font-size: 8pt;" |
| 3
#[[The Attwell Building]]  
|-
#[[The Balchin Building]]
| style="padding-left: 10px;" |[[The Style Building]]
#[[The Barstow Building]]
| 3
#[[The Cheeke Building (Eastonwood)]]
|-
#[[The Coutts Building]]
| style="padding-left: 10px;" |[[The Eglen Building]]
#[[The Curme Building (Molebank)]]
| 2
#[[The Daubeney Building]]
|-
#[[The Ducat Building]]
| style="padding-left: 10px;" |[[The Evett Building]]
#[[The Eagan Building‎]]
| 2
#[[The Flowar Building (West Becktown)]]
|-
#[[The Gilesi Building]]
| style="padding-left: 10px;" |[[The Frauley Building]]
#[[The Godden Building]]
| 2
#[[The Hambidge Building]]
|-
#[[The Harold Building]]
| style="padding-left: 10px;" |[[The Oxley Building (West Becktown)|The Oxley Building]]
#[[The Harraway Building]]
| 2
#[[The Haslock Building (Quarlesbank)]]
|-
#[[The Heathcote Building]]
| style="padding-left: 10px;" |[[The Pask Building]]
#[[The Hellyer Building (Brooke Hills)]]
| 2
#[[The Herman Building]]
|-
#[[The Hippesley Building]]
| style="padding-left: 10px;" |[[The Attwell Building]]
#[[The Kening Building]]
| 1
#[[The Laimbeer Building]]
|-
#[[The Latrobe Building]]
| style="padding-left: 10px;" |[[The Balchin Building]]
#[[The Lockwood Building]]
| 1
#[[The Marfell Building]]
|-
#[[The Neagle Building‎]]
| style="padding-left: 10px;" |[[The Barstow Building]]
#[[The Nettleton Building]]
| 1
#[[The Nix Building‎]]
|-
#[[The Pankhurst Building]]
| style="padding-left: 10px;" |[[The Cheeke Building (Eastonwood)]]
#[[The Russell Building‎]]
| 1
#[[The Serrell Building]]
|-
#[[The Sheppard Building]]
| style="padding-left: 10px;" |[[The Coutts Building]]
#[[The Stagg Building]]
| 1
#[[The Staples Building]]
|-
#[[The Stonnard Building]]
| style="padding-left: 10px;" |[[The Daubeney Building]]
#[[The Sugg Building]]
| 1
#[[The Sweeney Building]]
|-
#[[The Telfer Building‎]]
| style="padding-left: 10px;" |[[The Ducat Building]]
#[[The Tryme Building]]
| 1
#[[The Whatmore Building]]
|-
#[[The Woolsett Building‎]]
| style="padding-left: 10px;" |[[The Eagan Building‎]]
| valign="top" | 1
| 1
|-
| style="padding-left: 10px;" |[[The Flowar Building (West Becktown)]]
| 1
|-
| style="padding-left: 10px;" |[[The Gilesi Building]]
| 1
|-
| style="padding-left: 10px;" |[[The Godden Building]]
| 1
|-
| style="padding-left: 10px;" |[[The Hambidge Building]]
| 1
|-
| style="padding-left: 10px;" |[[The Harold Building]]
| 1
|-
| style="padding-left: 10px;" |[[The Harraway Building]]
| 1
|-
| style="padding-left: 10px;" |[[The Haslock Building (Quarlesbank)]]
| 1
|-
| style="padding-left: 10px;" |[[The Heathcote Building]]
| 1
|-
| style="padding-left: 10px;" |[[The Hellyer Building (Brooke Hills)]]
| 1
|-
| style="padding-left: 10px;" |[[The Herman Building]]
| 1
|-
| style="padding-left: 10px;" |[[The Hippesley Building]]
| 1
|-
| style="padding-left: 10px;" |[[The Kening Building]]
| 1
|-
| style="padding-left: 10px;" |[[The Laimbeer Building]]
| 1
|-
| style="padding-left: 10px;" |[[The Latrobe Building]]
| 1
|-
| style="padding-left: 10px;" |[[The Lockwood Building]]
| 1
|-
| style="padding-left: 10px;" |[[The Marfell Building]]
| 1
|-
| style="padding-left: 10px;" |[[The Neagle Building‎ ]]
| 1
|-
| style="padding-left: 10px;" |[[The Nettleton Building]]
| 1
|-
| style="padding-left: 10px;" |[[The Nix Building‎]]
| 1
|-
| style="padding-left: 10px;" |[[The Pankhurst Building]]
| 1
|-
| style="padding-left: 10px;" |[[The Russell Building‎]]
| 1
|-
| style="padding-left: 10px;" |[[The Serrell Building]]
| 1
|-
| style="padding-left: 10px;" |[[The Sheppard Building]]
| 1
|-
| style="padding-left: 10px;" |[[The Stagg Building]]
| 1
|-
| style="padding-left: 10px;" |[[The Staples Building]]
| 1
|-
| style="padding-left: 10px;" |[[The Stonnard Building]]
| 1
|-
| style="padding-left: 10px;" |[[The Sugg Building]]
| 1
|-
| style="padding-left: 10px;" |[[The Sweeney Building]]
| 1
|-
| style="padding-left: 10px;" |[[The Telfer Building‎]]
| 1
|-
| style="padding-left: 10px;" |[[The Tryme Building]]
| 1
|-
| style="padding-left: 10px;" |[[The Whatmore Building]]
| 1
|-
| style="padding-left: 10px;" |[[The Woolsett Building‎]]
| 1
|- style="border-top: 2px solid silver;"
|- style="border-top: 2px solid silver;"
| style="padding-left: 10px; " | '''TOTAL'''
| style="padding-left: 10px; " | '''TOTAL'''
| '''118'''
| '''119'''
|}
|}


Line 284: Line 196:
|-style="height:54px"
|-style="height:54px"
|style="border:solid 2px silver; background-color: #F99;"| Owsleybank<br />0 / 2
|style="border:solid 2px silver; background-color: #F99;"| Owsleybank<br />0 / 2
|style="border:solid 2px silver; background-color: #FFC;"| Molebank<br />5 / 6
|style="border:solid 2px silver; background-color: #CFC;"| Molebank<br />6 / 6
|style="border:solid 2px silver; background-color: #CFC;"| Lukinswood<br />1 / 1
|style="border:solid 2px silver; background-color: #CFC;"| Lukinswood<br />1 / 1
|style="border:solid 2px silver; background-color: #EEE;"| Havercroft<br />0 / 0
|style="border:solid 2px silver; background-color: #EEE;"| Havercroft<br />0 / 0

Revision as of 10:08, 11 April 2012

     
Doctor Parrott
Doctor Parrott
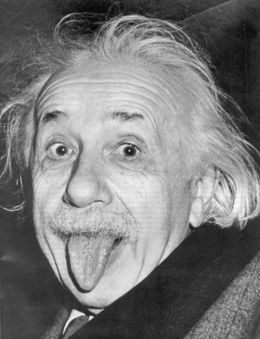
Einstein.jpg
Player Type Scientist (NecroTech's self-appointed Head of Zombie Behavioural Research)
Group Rotter's Relief
Base of Operations The Peet Building
Goals Understanding what makes zombies tick
Likes Jaffa cakes, tea, gurning, jabbing things with needles
Character Owner Chief Seagull
Satellite Phone No. 891-2011

Biography

Dr Nestor Parrott, born 33 years ago (or so he says), studied at Milton Keynes Polytechnic and gained his PhD in Human Biology at the tender-ish age of 24. After completing his studies, he gained employment with NecroTech as a lab assistant where he witnessed all manner of distressing experiments involving reanimating the dead. So distressing in fact that it turned his hair white and put a shedload of wrinkles on his face. Undeterred by this, he poured his energies into perfecting revivification techniques, leading to his penchant of jabbing things with needles.

Shortly after the Malton Incident, he learned that his dimwitted younger cousin (known only as 'Chief Seagull') had been sighted on the city streets, shambling with a horde of zombies and munching on the brains of unfortunate survivors. Concerned with his cousin's wellbeing, and realising that he would have the opportunity to jab things with needles to his heart's content, Dr Parrott volunteered his services. He was assigned to the Peet Building where he became a member of Judgewood Vector Control, a group of locals formed to fight the zombie menace and beautify their neighbourhood. After that group disappeared, he signed up with Rotter's Relief after helping them to establish the Peet Building as a rot revive clinic.

Despite his relatively high IQ and his doctorate in jabbing things with needles, he has a habit of forgetting his job and has been witnessed wandering around outside for no good reason.

NecroNet Log
NT Building Scans
The Peet Building 30
The Ludlow Building 13
The Perceval Building 9
The Shears Building 4
  1. The Milnerr Building
  2. The Purt Building
  3. The Selley Building (Jensentown)
  4. The Style Building
3
  1. The Eglen Building
  2. The Evett Building
  3. The Frauley Building
  4. The Oxley Building (West Becktown)
  5. The Pask Building
2
  1. The Attwell Building
  2. The Balchin Building
  3. The Barstow Building
  4. The Cheeke Building (Eastonwood)
  5. The Coutts Building
  6. The Curme Building (Molebank)
  7. The Daubeney Building
  8. The Ducat Building
  9. The Eagan Building‎
  10. The Flowar Building (West Becktown)
  11. The Gilesi Building
  12. The Godden Building
  13. The Hambidge Building
  14. The Harold Building
  15. The Harraway Building
  16. The Haslock Building (Quarlesbank)
  17. The Heathcote Building
  18. The Hellyer Building (Brooke Hills)
  19. The Herman Building
  20. The Hippesley Building
  21. The Kening Building
  22. The Laimbeer Building
  23. The Latrobe Building
  24. The Lockwood Building
  25. The Marfell Building
  26. The Neagle Building‎
  27. The Nettleton Building
  28. The Nix Building‎
  29. The Pankhurst Building
  30. The Russell Building‎
  31. The Serrell Building
  32. The Sheppard Building
  33. The Stagg Building
  34. The Staples Building
  35. The Stonnard Building
  36. The Sugg Building
  37. The Sweeney Building
  38. The Telfer Building‎
  39. The Tryme Building
  40. The Whatmore Building
  41. The Woolsett Building‎
1
TOTAL 119

To do list

  • DON'T GET EATEN!!! (again)
  • Keep the Peet Building nice and tidy
  • Keep the its generator repaired and fuelled
  • Keep the factory next door caded and lit
  • Keep a healthy stock of revive needles and first aid kits
  • Check revive requests for people who want to be jabbed with needles
  • Patrol revive points and jab things with needles where possible
  • Check and maintain other NT buildings in JW and neighbouring suburbs
  • Report to NecroNet from Peet and other nearby NT buildings
Dakerstown
1 / 1
Jensentown
2 / 2
Quarlesbank
4 / 4
West Boundwood
0 / 0
East Boundwood
1 / 1
Lamport Hills Chancelwood Earletown Rhodenbank Dulston
Roywood
3 / 4
Judgewood
3 / 3
Gatcombeton
0 / 0
Shuttlebank
3 / 3
Yagoton
3 / 3
Millen Hills Raines Hills Pashenton Rolt Heights Pescodside
Peddlesden Village
0 / 1
Chudleyton
1 / 2
Darvall Heights
2 / 2
Eastonwood
6 / 6
Brooke Hills
2 / 2
Shearbank Huntley Heights Santlerville Gibsonton Dunningwood
Dunell Hills
0 / 1
West Becktown
3 / 3
East Becktown
4 / 4
Richmond Hills
2 / 2
Ketchelbank
3 / 3
Roachtown Randallbank Heytown Spracklingbank Paynterton
Owsleybank
0 / 2
Molebank
6 / 6
Lukinswood
1 / 1
Havercroft
0 / 0
Barrville
4 / 4
Ridleybank Pimbank Peppardville Pitneybank Starlingtown
Grigg Heights Reganbank Lerwill Heights Shore Hills Galbraith Hills Stanbury Village Roftwood Edgecombe Pegton Dentonside
Crooketon Mornington North Blythville Brooksville Mockridge Heights Shackleville Tollyton Crowbank Vinetown Houldenbank
Nixbank Wykewood South Blythville Greentown Tapton Kempsterbank Wray Heights Gulsonside Osmondville Penny Heights
Foulkes Village Ruddlebank Lockettside Dartside Kinch Heights West Grayside East Grayside Scarletwood Pennville Fryerbank
New Arkham Old Arkham Spicer Hills Williamsville Buttonville Wyke Hills Hollomstown Danversbank Whittenside Miltown

Key: 100% complete / 50%+ complete / 49%- complete / 0% complete / No NecroNet coverage


NecroWatch.png NecroWatch
Dr Parrott is a NecroTechnician who works with NecroWatch to monitor Malton's NecroNet system. Dr Parrott has proven his dedication to the pursuit of truth and knowledge.


ForScience.gif Dr Parrott's Ribbons
NecroTechnician - Rank 4 All-Seeing Eye
Latrobe Honorary Extinction Vigilance Barrville Tour of Duty Eastonwood Tour of Duty
Syringe crosshairs sml.jpg Fertilize the Land Policy
Dr Parrott believes in regaining NT buildings at any cost!
Medic.png Combat Reviver
Dr Parrott supports the strategy known as 'Combat Revival'.